
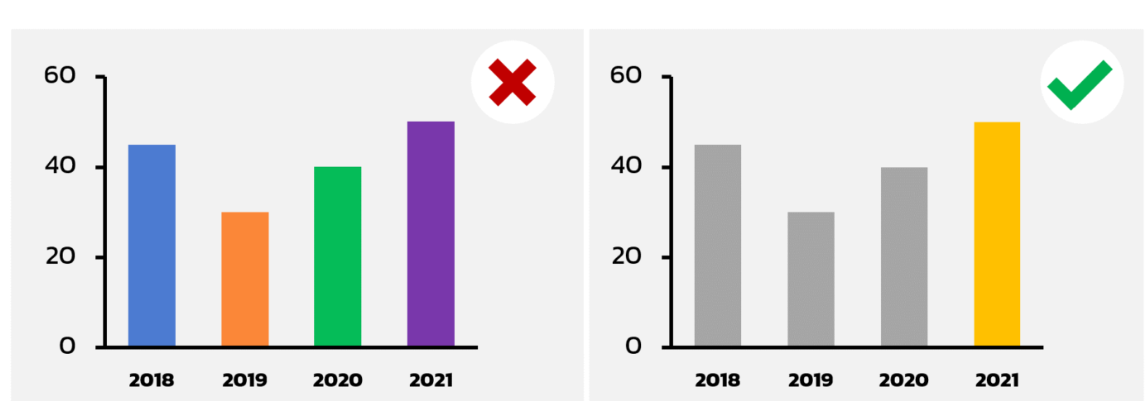
always begin y axis with 0

use monotone color rather than multicolor this will help reader more understand easily ,however if you want to emphasize on the single bar chart then possible to hilight on that bar.

If you want to learn computer language I would like to inform about 2 or 3 computer languages coding form like HTML ,Pyton and JS.
there are a couples of windows coding software availble on the internet to download and install ,for this article I would like to suggest the VSC or Visual Studio coding.
with this VSC is a bundle of tools and learning sources from html ,Js and pyton and etc.
Vsc is free tools to download and instll on windows and I pasted the link below for download and install.
var msg = 'Hello World';
console.log(msg);
For this tutorial I am going to walk you through the step by step on how to install ubuntu linux desktop on windows PC.
if you keen on learning about installing linux operating system for having fun experience or for work ,then this article will show you how to do that.
what you need.
PC with windows10 or 11
step 1 install Windows Subsystem for Linux (WSL)there are two ways to install
installed from the command line

สำหรับบทความรู้ในวันนี้ admin ขอนำมาฝากคนที่สนใจศึกษาการเขียนโปรแกรม PHP ในการใช้งาน กับหน่วยงาน หรือองค์กร หรือโปรเจคส่งอาจารย์
ชุดคำสั่งการทำงานของภาษา PHP จะเรียกว่า PHP script โดยจะแทรกในคำสั่งภาษา HTML เพื่อให้ผู้ใช้งานสามารถอัพโหลดไฟล์ ขึ้นไปเก็บที่เครื่องบริการแม่ข่าย Server โดยไฟล์จะถูกเก็บไว้ที่แฟ้มชั่วคราว แล้วค่อยย้ายไปที่เก็บถาวรอีกภายหลังด้วยชุดคำสั่ง PHP
ไฟล์ phpinfo.php จะอธิบายถึงโฟลเดอร์ชั่วคราว ที่จะใช้ในการพักไฟล์ที่อัพมาขั้นแรก upload_tem_dir และขนาดไฟล์มากสุดที่อนุญาตให้อัพได้ ด้วยคำสั่ง upload_max_filesize ซึ่งค่ากำหนดเหล่านี่จะต้องระบุในไฟล์ php.ini
กระบวนการทำงาน
เริ่มจากผู้ใช้งานเปิดเพจ HTML ฟอร์มอัพโหลดไฟล์ มีกล่องข้อความ มีปุ่ม browse เข้าไปเลือกไฟล์ในเครื่อง และปุ่ม อัพโหลด
ผู้ใช้งานคลิก browse เข้าไปเลือกไฟล์ในเครื่องที่ต้องการอัพโหลด เช่น .doc ,.pdf เป็นต้น
เส้นทางไปยังไฟล์ที่อัพโหลดจะแสดงขึ้นมาในช่องข้อความ และคลิกปุ่ม อัพโหลด
ไฟล์จะถูกส่งไปยังโฟลเดอร์ชั่วคราวบนแม่ข่าย
คำสั่งการทำงานภาษา PHP Script จะเริ่มทำงาน ตามที่กำหนดในแบบฟอร์ม action และตรวจสอบการอัพไฟล์ และบันทึกลงแม่ข่ายเรียบร้อย และแสดงข้อความยืนยันการส่งไฟล์ สำเร็จ
สำหรับผู้พัฒนางาน ต้องอนุญาตสิทธิการเขียนไฟล์ write ในโฟลเดอร์ชั่วคราว หรือถาวร ไม่แล้วจะทำงานไม่ได้
สร้างแบบฟอร์มอัพโหลดไฟล์
ตัวอย่างหน้า HTML สร้างหน้าอัพโหลดไฟล์ตัวอย่าง ซึ่งจะใช้วิธี Post และกำหนคำสั่งการควบคุมการทำงานด้วยชุดคำสั่งแบบ enctype (คำสั่งสำหรับเข้ารหัสไฟล์ เพื่อทำให้ไฟล์สามารถส่งผ่านฟอร์มแบบ POST ได้ 2. enctype="multipart/form-data" จะกำหนดไว้ที่แท็ก form ของ HTML และใช้งานร่วมกับ input submit.)
ตัวอย่าง ฟอร์ม HTML
<?php
   if(isset($_FILES['image'])){
      $errors= array();
      $file_name = $_FILES['image']['name'];
      $file_size =$_FILES['image']['size'];
      $file_tmp =$_FILES['image']['tmp_name'];
      $file_type=$_FILES['image']['type'];
      $file_ext=strtolower(end(explode('.',$_FILES['image']['name'])));

      $extensions= array("jpeg","jpg","png");

      if(in_array($file_ext,$extensions)=== false){
         $errors[]="extension not allowed, please choose a JPEG or PNG file.";
      }

      if($file_size > 2097152){
         $errors[]='File size must be excately 2 MB';
      }

      if(empty($errors)==true){
         move_uploaded_file($file_tmp,"images/".$file_name);
         echo "Success";
      }else{
         print_r($errors);
      }
   }
?>
<html>
   <body>

      <form action="" method="POST" enctype="multipart/form-data">
         <input type="file" name="image" />
         <input type="submit"/>
      </form>

   </body>
</html>
เขียน script ภาษา PHP
ค่าตัวแปรชนิด global เรียนว่า $_FILES. ซึ่งจะสร้างตัวแปรที่เกี่ยวข้องในการอัพไฟล์ จำนวน 5 ตัวแปรด้วยกัน คือ $_FILES['file']['tmp_name'] −ไฟล์ที่อัพไปที่แฟ้มชั่วคราวของแม่ข่าย
$_FILES['file']['name'] − ชื่อของไฟล์ที่ถูกอัพโหลด
$_FILES['file']['size'] − ขนาดของไฟล์
$_FILES['file']['type'] −ตัวแปรระบุชนิดของไฟล์
$_FILES['file']['error'] − ค่าความผิดพลาดการทำงาน
<?php
   if(isset($_FILES['image'])){
      $errors= array();
      $file_name = $_FILES['image']['name'];
      $file_size = $_FILES['image']['size'];
      $file_tmp = $_FILES['image']['tmp_name'];
      $file_type = $_FILES['image']['type'];
      $file_ext=strtolower(end(explode('.',$_FILES['image']['name'])));

      $extensions= array("jpeg","jpg","png");

      if(in_array($file_ext,$extensions)=== false){
         $errors[]="extension not allowed, please choose a JPEG or PNG file.";
      }

      if($file_size > 2097152) {
         $errors[]='File size must be excately 2 MB';
      }

      if(empty($errors)==true) {
         move_uploaded_file($file_tmp,"images/".$file_name);
         echo "Success";
      }else{
         print_r($errors);
      }
   }
?>
<html>
   <body>

      <form action = "" method = "POST" enctype = "multipart/form-data">
         <input type = "file" name = "image" />
         <input type = "submit"/>

         <ul>
            <li>Sent file: <?php echo $_FILES['image']['name'];  ?>
            <li>File size: <?php echo $_FILES['image']['size'];  ?>
            <li>File type: <?php echo $_FILES['image']['type'] ?>
         </ul>

      </form>

   </body>
</html>

Step 1 desing your table as below
Main table what data your want to keep in this tutorial I am going to make this
Id
items
sorial no
brand
model
image
date of receiving
doc
item location
item qrcode
status
------------
create 2 ref.tables for the item location and the items
for the items
id
items list
for the item location
id
location name
-------------------------
now go to the appsheet
create the new app
name the app as computer app
and import all the table into the app
for each table go to the column view and select the column type that relate to the data we want to store.
-----------------------------------------
That all for the 1st ep.
Next ep.2 will be about how to make a dropdown menu for the column items and the items location by using the Valid_if function
and a step of UX view ,form view and input some data in order to show how to app.
this step will cover how to link to google qrcode service which later we can print out and stick to the computer case for scanning purpose.
What is a dropdown menu ? the pre-list which admin can control the data input as he or she want to.
for user who fill the form with simple and fast action.
I would like new learnners supposed to learn how to make a prelist by using Enum first,then try using valid_if
First go to Google sheet and create data table for your source database file.
column datatype
Id key unique
Items name text
Item serialno text
Items type text using valid_if
Items Date date
Item image image
Item budget enum
Item workstation text using valid_if
Item doc file
----------------------------------
make another table call items type
column data type
id unique
items name text
then fill up the table with your data as below for example.

when go to appsheet and connect to the table
column view specific the table and column
in the valid_if box
type : table name [column name]
the good thing about using the valid dropdown is that you can make many apps by using the same reference source table.
on the view app
go to the form and click on the column to test the dropdown menu.
-----------------
how to manually enter the options for the column dropdown list
on the valid if condition type {"option1","option2","option3"}
--------------------
another ways of the dropdown menu is by using the select function
you have to add another column to the table
then on the valid if condition type : select(Table name[Column Name List],[constraint column name]="TRUE"
so in sum up how to create the dropdown menu in appsheet app.
you got 3 options to do so.
Microphone Boost is a Windows built-in setting that can be used to increase the volume while using some voice-over-IP services like Discord and Skype
when you are on VTC calling for teaching or presentation like Zoom ,Meet and webex for example
make sure that the audio is function properly ,however if got the low audio and voice here are the hits
try to talk close to the mic and speak up
go to the microphone boots on Windows10 and increas the boots level
how to access the microphone boots on Windows10
right click on the speaker icon
then open sound setting
click device property and choose addition device property

click tab level


